Réparation du revêtement endommagé
Réparation des dommages Revêtement conforme est une tâche courante dans les Assemblage du circuit imprimé et Assemblage SMT, Il est possible d'effectuer des réparations sur le circuit, en particulier en cas de défauts, de dommages dus à la manipulation ou de retouches des composants. Un processus de réparation approprié rétablit la protection sans affecter les performances du circuit.
Identifier le type de dommage
Avant de procéder à la réparation, il faut déterminer le problème :
- Rayures ou zones de revêtement mince
- Fissures ou décollement
- Bulles ou vides
- Contamination sous le revêtement
- Taches brûlées ou endommagées par des produits chimiques
La compréhension du défaut permet de choisir la bonne méthode de réparation dans les cas suivants Assemblage de circuits imprimés clés en main.
Choisir la bonne méthode de réparation
Des revêtements différents nécessitent des approches différentes :
- Revêtements acryliques → facile à dissoudre et à retravailler
- Revêtements en silicone → souple mais plus difficile à enlever
- Revêtements en uréthane → résistance chimique, difficulté moyenne
- Revêtements époxy → très résistant, difficile à réparer
Le choix de la bonne méthode permet d'éviter d'endommager davantage la carte de circuit imprimé.
Enlever le revêtement endommagé
Utiliser des techniques d'élimination appropriées :
- Élimination des solvants pour les revêtements acryliques
- Retrait mécanique (grattage, micro-abrasion) pour les zones localisées
- Décapage chimique pour des revêtements plus résistants
- Chaleur contrôlée pour adoucir certains matériaux
En Assemblage du circuit imprimé, L'enlèvement doit être limité à la zone endommagée afin de protéger les composants environnants.
Nettoyer soigneusement la surface
Après le retrait :
- Utiliser des solvants de nettoyage approuvés
- Éliminer les résidus, la poussière et les contaminants
- S'assurer que la zone est complètement sèche
Un bon nettoyage est essentiel pour assurer une bonne adhérence lors de la réapplication. Revêtement conforme.
Réparer la carte de circuit imprimé si nécessaire
Si le dommage a affecté le circuit :
- Remplacer ou ressouder les composants
- Réparer les traces ou les tampons
- Effectuer des contrôles électriques
Cette étape permet de s'assurer que la carte est entièrement fonctionnelle avant l'application d'une nouvelle couche de peinture. Assemblage SMT.
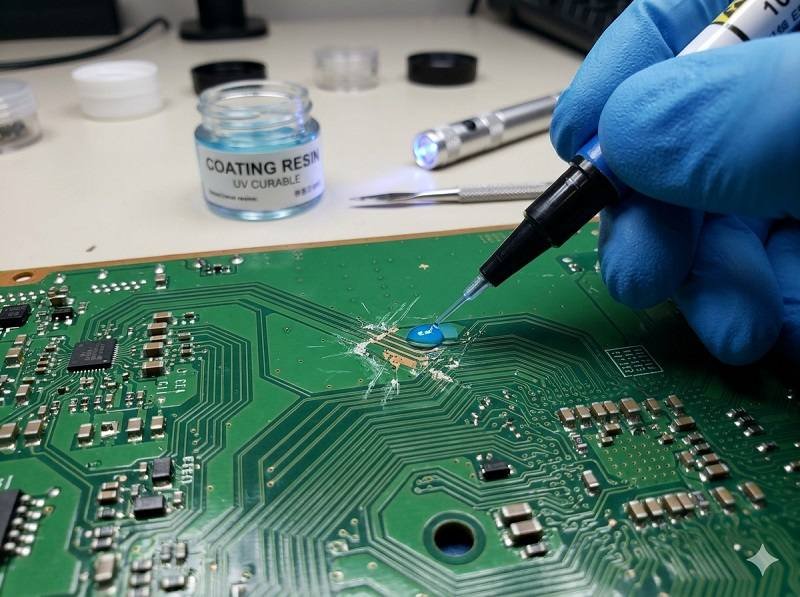
Réapplication du revêtement conforme
Appliquer le nouveau revêtement sur la zone réparée :
- Utiliser des méthodes de revêtement au pinceau, par pulvérisation ou sélectives
- Correspondre, dans la mesure du possible, au type de revêtement d'origine
- Maintien d'une épaisseur uniforme et d'une couverture lisse
Éviter de recouvrir les connecteurs, les points d'essai et les autres zones sans revêtement dans la zone d'application. Assemblage de circuits imprimés clés en main.
Durcissement du revêtement
Le durcissement dépend du matériau :
- Séchage à l'air (acrylique)
- Durcissement à chaud (uréthane, époxy)
- Durcissement aux UV (vernis durcissant aux UV)
Respecter les conditions de durcissement appropriées pour garantir la durabilité.
Inspecter la zone réparée
Après durcissement :
- Utiliser l'inspection UV pour vérifier la couverture
- Vérifier qu'il n'y a pas de bulles, de lacunes ou de contamination
- Confirmer la bonne adhérence et l'épaisseur
L'inspection permet de s'assurer que la réparation est conforme Assemblage du circuit imprimé les normes de qualité.
Meilleures pratiques pour la réparation des revêtements
- Utiliser des revêtements qui permettent de retravailler facilement lorsque c'est possible
- Minimiser la zone de réparation afin d'éviter les enlèvements inutiles
- Respecter des procédures strictes de nettoyage et de manipulation
- Former les techniciens à un travail de réparation précis
Conclusion
Réparation des dommages Revêtement conforme implique d'enlever, de nettoyer, de réparer et de réappliquer avec soin. Dans les Assemblage du circuit imprimé, Assemblage SMT, et Assemblage de circuits imprimés clés en main, Un processus de réparation bien contrôlé rétablit la protection, maintient la fiabilité et prolonge la durée de vie des produits électroniques.
Obtenir un devis pour un revêtement conforme
Vous souhaitez améliorer la fiabilité de vos circuits imprimés grâce au revêtement conforme ? Envoyez-nous vos coordonnées dès maintenant.
Envoyez-nous vos exigences et obtenez une réponse rapide de notre équipe d'ingénieurs.
✔ Réponse dans les 24 heures ✔ Soutien technique ✔ Production en petite et grande série
Shenzhen Tengxinjie Electronics Co. Ltd.